Video tutorial for creating/deploying web application on java: Creating and Deploying Java Web Application on AWS Elastic Beanstalk Using Eclipse
Table of Content
Development Environment Setup
Setting up the Eclipse
Developing Simple Java Web Application for AWS
Creating Eclipse Project
Test Eclipse project on your local environment
Deploying on AWS
Creating access keys and configuring those in Eclipse
Creating Server in Eclipse which points to server in AWS
Development Environment Setup
First thing is to setup the development environment. For this you would need JDK, eclipse, tomcat. You can download these using the below links provided.JDK 8 download: https://www.oracle.com/technetwork/java/javase/downloads/jdk8-downloads-2133151.html
Eclipse IDE for Java EE: https://www.eclipse.org/downloads/packages/release/neon/3/eclipse-ide-java-ee-developers
Eclipse plugin for AWS: https://marketplace.eclipse.org/content/aws-toolkit-eclipse
Apache tomcat 8.0: https://tomcat.apache.org/download-80.cgi
Setting up the Eclipse
Once you have downloaded and installed the Eclipse, the next step is to install the AWS Eclipse plugin.You want you can install the AWS plugin by directly using the link provided in Development Environment Setup. or you can follow below steps to install from within the Eclipse itself.
For installing plugin from Eclipse, go to the Help menu in Eclipse and open "Eclipse Marketplace".
In Eclipse Marketplace you can search and install below AWS plugin.
Developing Simple Java Web Application for AWS
We will be developing very simple java web application and then we will test it locally and finally deploy on AWS.
We will be creating a simple jsp in a web application which simply displays some text.
Creating Eclipse Project
Here we will be creating regular WTP dynamic web project. You can also create the AWS Web App that comes with AWS toolkit eclipse plugin, but that was giving me some errors while running the project. So its better to create the regular WTP project.
You have to create a new Eclipse Project. Type of the project would be Web --> Dynamic Web Project as below. and click on Next.
You have to create a new Eclipse Project. Type of the project would be Web --> Dynamic Web Project as below. and click on Next.
On next screen, you have to provide project name for the web application and click Finish. You can give any name you want over here.
On click of Finish, Eclipse will create the project into your workspace.
Once the project is created, please make sure you have following versions set in "Project Facets".
We would need Dynamic Web Module set to 3.0 and Java to 1.8.
Once the project is created, you can add whatever to want in that project like Jsp, Servlets etc..
Here for demonstration we will add only one jsp "index.jsp" under WebContent directory.
Here is a sample content of that jsp.
<%@ page language="java" contentType="text/html; charset=UTF-8"
    pageEncoding="UTF-8"%>
<!DOCTYPE html>
<html>
<head>
<meta charset="UTF-8">
<title>Insert title here</title>
</head>
<body>

This is a test jsp being served from AWS

</body>
</html>
Test Eclipse project on your local environment
Before we deploy the project on AWS, we need to test it locally. As we only have 1 jsp in our sample application, there is no need to test locally, but if you are going to deploy a big project, then it must consider testing that locally before deploying that on AWS.To test the project locally, you have to create the tomcat server in Eclipse. Download the tomcat from this link: https://tomcat.apache.org/download-80.cgi and follow below steps to create a local tomcat server in Eclipse.
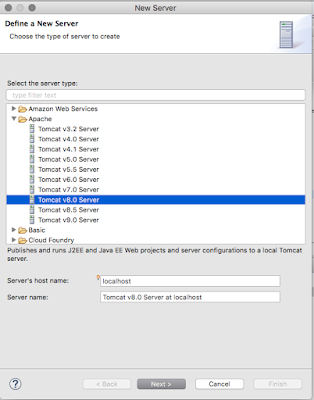
Go to Servers view, right click --> New --> Server. Select Apache and then Tomcat V8.0 Server.
Click on the next and in the next screen provide the tomcat path as below. and click on Finish.
You should see the server in the Servers view as below.
Now to run the project on this local server, right click on the project --> Run as --> Run on Server.
Your application will be deployed on local tomcat and will display demo jsp as below.
This way we should test our application locally before deploying on AWS.
Deploying on AWS
Creating access keys and configuring those in Eclipse
To deploy the java web application on AWS, we will be used AWS managed service called "Elastic Beanstalk". Using this service, AWS will provide the platform to deploy the web application. AWS will provide server machine, JDK, tomcat etc.. whatever required to run the application.
To start deploying the application, you would need to create the access key and configure it in Eclipse.
We will be creating security key for root account. However this is not recommended by AWS. We should always create IAM user in AWS and we should work this that IAM user only.
But as deploying web application on AWS requires many permissions, and if we create the new IAM user then we have to grant those permissions to IAM user. Rather than doing that, we would be using root account for demo purpose.
So to create the access keys, login to root account on AWS. On the top right corner, click on your username and go to "My Security Credentials".
In My Security Credentials screen, navigate to "Access keys (access key ID and secret access key)" tab as below. and create new security key. Please note that, you have to copy newly created access keys somewhere before closing the dialog box. Otherwise you won't be able to copy secret key. AWS doesn't allow copying secret keys for root accounts.
Now you have to configure these keys into Eclipse. Go to the Eclipse --> Preferences --> AWS Toolkit (from left menu). and paste those security keys there as below.
Creating Server in Eclipse which points to server in AWS
Now its time to deploy the web application on AWS. For this we would need to create a server in Eclipse which points to the server on AWS. As we don't have any server on AWS, this will create a new server on AWS and link that server to the server we will be creating in Eclipse.
For that right click in Servers view then click on New --> Server. and select Amazon Web Services --> AWS Elastic Beanstalk for Tomcat 8. and click on the Next.
In the next screen, we have to provide the region, application and environment name as below.
AWS will create the mentioned application and environment in the provided region on this screen.
In the next screen it will ask for roles. For now keep the role names as default one. If these roles are not present on AWS then those will be created.
In the next screen, it will ask for some advanced properties that we are not going to configure right now and those are not needed for our sample application. click on next on advance properties configuration screen.
At last you would see below option, where you have to add your application for deployment on AWS.
and click on finish.
Once the server is created, you would now see 2 servers in the Servers view. One we created for testing on local and other is AWS server. AWS Beanstalk server points to the remote server on AWS. so you will start/stop this server, the remote server will be started/stopped accordingly.
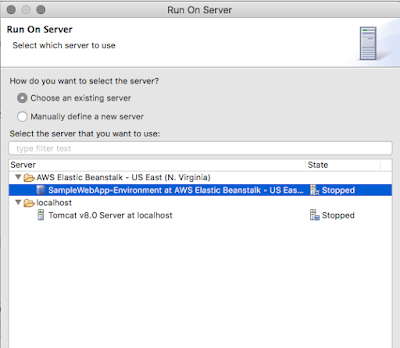
To deploy and run our application on AWS, just run the application on AWS Beanstalk server we just created by right clicking the project --> Run As --> Run as server. it will ask to select the server this time. so select AWS Beanstalk server as below. and click finish.
In case it gives the error while deploying and running the application, you have to try running after few minutes later. The error might come because if you are running the application first time, AWS might be creating the platform required for this and it might be timing out.
To check the status of what AWS is doing when you run the application from Eclipse, go to the AWS console --> Elastic Beanstalk service.
You would see your web application being created there. and it might be creating the environment needed for that.
You can also see the steps performed by AWS in Your Application --> Your environment --> Events section as below.
To access the application you just deployed on AWS, Click on your environment and you would see the link there.
You should be able to access your application using that url.


